How to enable Hyper-V in Windows 11
Hyper-V is Microsoft's internal virtualization solution for Windows 11. It allows you to create virtual machines and run them on virtual hardware. In other words, if you want to use Hyper-V on your computer, you need to enable it first.
In this article, we will show you three ways to enable Hyper-V in Windows 11 and create a virtual machine without third-party tools.
recommend:How to rename, upgrade, or delete a Hyper-V virtual machine
What are the use cases for Hyper-V?
Hyper-V is a native virtualization tool that allows you to run multiple operating systems virtually on your system without affecting the host operating system.
With Hyper-V, you don't have to rely on third-party hypervisor solutions such as VirtualBox and VMware Workstation.
Some Hyper-V virtual machine use cases include:
- Run and test software for older versions of Windows or non-Windows operating systems.
- Test software on multiple operating systems using multiple virtual machines on a single host system.
Prerequisites for enabling Hyper-V on Windows 11

Hyper-V is offered as an optional feature on Windows 11 Pro, Enterprise, and Education editions. To check your Windows version, please go to [link to relevant page]. Settings > System > AboutThen, check. Window Specifications This section is for finding your Windows version.
If you have the Home edition, here's how to install Hyper-V on Windows 11 Home. All you have to do is run a batch script to install Hyper-V on incompatible systems.
Depending on the number of virtual machines you plan to run and the types of applications you use, you may need more resources to run the virtual machines smoothly.
In addition, you need to enable hardware virtualization in the BIOS. It is a basic feature for running virtual machines on Windows systems, but it is usually disabled by default.
How to enable hardware virtualization in BIOS
On compatible systems, you can enable hardware virtualization in the BIOS. The following steps apply to HP PCs. If you are using a custom PC or laptop from another manufacturer, please refer to your user manual for detailed instructions. Otherwise, please refer to our general guide on how to access the BIOS on Windows.
To enable hardware virtualization in the BIOS:
- If your PC is powered on, please turn it off.
- Please press strength Press the button to start the system and begin pressing. Esc Key to view Start Menu.
- Inside Start Menu, according to F10 enter BIOS settings.

- In the BIOS setup utility, use the arrow keys to open... Configuration Label.
- Next, use the down arrow key to highlight. Virtualization technology Options.

- beat Enter Then select Enable From the options.
- according to F10 Save changes and exit BIOS.
- Your PC will restart and apply the changes. This may take some time, so please wait until the system has fully restarted.
After restarting, you can enable Hyper-V on Windows 11. Here's how.
recommend:How to fix Windows login error 0x80280013
1. Open Hyper-V in Windows 11 through Control Panel
You can enable Hyper-V using the Windows Features dialog box. You can access Windows Features to add or remove optional features in Windows 11 from Control Panel. Here's how.
- according to win + R Open run.
- type control Then click OK Open the Control Panel.
- In the Control Panel, go to Programs > Programs and functions.
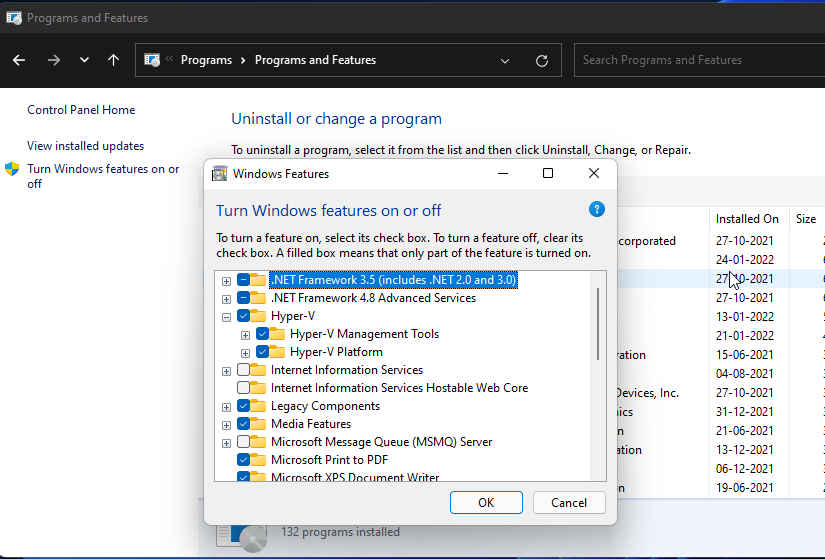
- In the left pane, click Turn Windows features on or off.
- Inside Windows features In the dialog box, select Super V. If you expand Hyper-V, you will see Hyper-V Management Tools and Hyper-V platform.
- Make sure both options are selected, then click. OKSince these are optional features, Windows will begin installing and enabling them on your PC. This process may take some time to complete.
- Once finished, click Restart now Restart and apply the changes.
After restarting, search for Hyper-V, click Hyper-V Manager, and you can create a virtual machine in Windows 11.
2. Use the command prompt to add Hyper-V to Windows 11

The command prompt provides a quick and efficient way to perform repetitive tasks. You can use the DISM (Deployment Image Servicing and Management) command-line tool to access and install optional Windows features through the command prompt.
Follow these steps to enable Hyper-V on Windows 11 using the command prompt:
- Please press win Key, then type OrderThen, right-click. Command Prompt And select Run as administrator.
- In the command prompt window, type the following command and press Enter to execute it:
DISM /Online /Enable-Feature /All /FeatureName:Microsoft-Hyper-V - The deployment image service and management tools will begin enabling Hyper-V features and display progress on the command prompt.
- After the operation is successfully completed, you will need to restart your PC. Therefore, press... yes Confirm the operation on the keyboard.
After your PC restarts, you can open and use Hyper-V Manager to create a virtual machine.
3. Enable Hyper-V using PowerShell
If you prefer Windows PowerShell over the command prompt, you can also enable Hyper-V using a shell application.
However, unlike the command prompt, PowerShell uses the enable-WindowsOptional features cmdlet to enable optional features in a Windows image.
To enable Hyper-V using PowerShell:
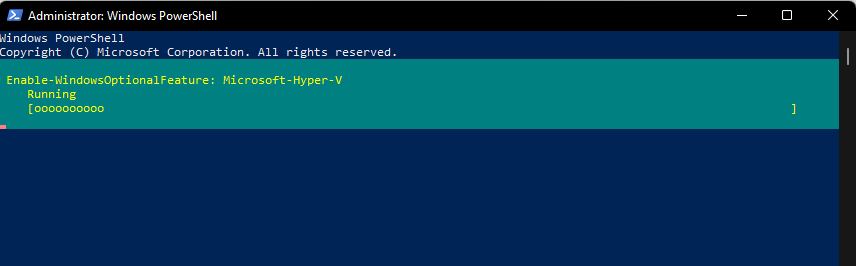
- Please press win Key, then type Power supply casingThen, right-click. Power supply casing And select Run as administrator.
- In the PowerShell window, type the following shell command and press Enter:
Enable-WindowsOptionalFeature -Online -FeatureName Microsoft-Hyper-V-All - PowerShell will run the cmdlet and initiate the Hyper-V enablement process. If successful, you will be prompted to restart your PC.
- type yes Confirmed. Your PC will restart to apply the changes and enable the new features.
recommend:How to fix Rocket League not launching on Windows 10/11
How to disable Hyper-V in Windows 11
While Hyper-V can be safely enabled and used, it can be easily disabled using PowerShell. This is useful if the virtualization tool causes conflicts with your antivirus solutions and other applications.
Disabling Hyper-V using PowerShell:
- Open Power supply casing As an administrator.
- In the PowerShell window, type the following command and press Enter:
Disable-WindowsOptionalFeature -Online -FeatureName Microsoft-Hyper-V-All - Wait for the success message to appear and then close PowerShell.
- Restart your PC to apply the changes.
Several ways to enable Hyper-V in Windows 11
Hyper-V is a Class 1 hypervisor, meaning it runs directly on the computer hardware. It is pre-installed, free to use without restrictions, and provides linear performance on consumer-grade systems.
In other words, dedicated virtual machines like VMware Workstation Pro can be used on multiple platforms, can be used on legacy systems, and are more suitable for enterprise solutions. See our comparison of three popular hypervisors to find the one that suits you best.